 Discs Index manual
Discs Index makes a searchable catalog of the contents of your CDs, DVDs, USB sticks or any other folder. You can browse and search the catalog without the disc itself. You can download Discs Index, and read how to install it, on the Discs Index page.
1. Introduction
An index with discs
Discs Index keeps everything in one index: a datafile with the extension .dix. An index contains discs.
A disc is the contents of a CD, DVD or folder at the moment you added it: all directories and, if you want, all filenames, plus information such as a title, the vendor, the media type and a memo.
You can have one index for all your discs, or more indexes, for example one for music and one for backups.
The main window
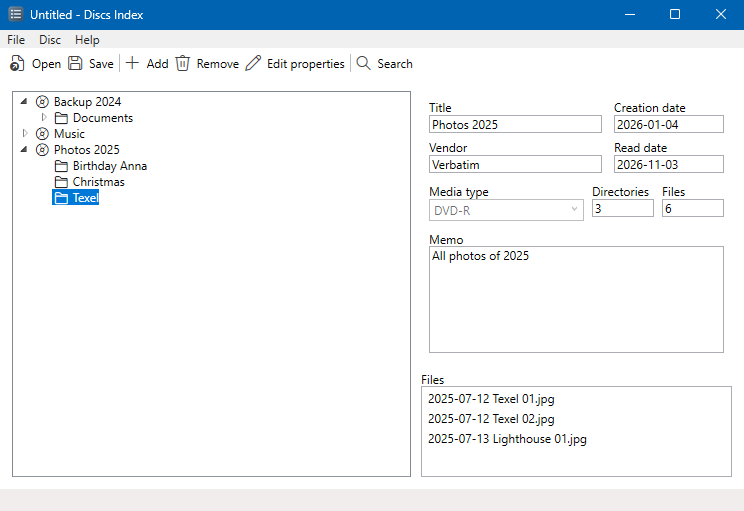
- The menu and the toolbar with Open, Save, Add, Remove, Edit properties and Search.
- On the left the tree with all discs (💿) and their directories (📁), sorted alphabetically.
- At the top right the information of the selected disc: Title, Creation date, Vendor, Read date, Media type, the number of Directories and Files, and the Memo. Here you can only read it; to change it, see Edit or remove a disc.
- At the bottom right Files: the filenames in the selected directory (only if the filenames were included when the disc was added).
- The status bar shows what Discs Index is doing, for example "Saving datafile...". During such an action the menu and the toolbar are disabled.
The title bar shows the title of the index, for example "Music - Discs Index". You can drag the borders between the tree and the right part, and between the disc information and Files. When you make the window larger, the tree grows.
Right-click a disc or directory in the tree for Add disc..., Remove disc, Edit properties... and Search. This manual opens from Discs Index with Help > Manual.
2. The index file
A new index
Discs Index starts with a new, empty index called "Untitled". To start another new index, choose File > New. The window Index properties opens, where you give the index a title (see Index properties).
Save and open
- File > Save (or Save on the toolbar) saves the index. It is only available when something has changed. The first time, Discs Index asks for a filename, with the title of the index as the suggested name.
- File > Save As saves the index under a new name.
- File > Open (or Open on the toolbar) opens another
.dixfile. You can also double-click a.dixfile in Windows Explorer.
Has the index changed, then Discs Index asks with New, Open and when you close it whether to save the index first: Yes, No or Cancel. After Yes, Discs Index only continues when the index has been saved.
.dix file is compressed, so even an index with many discs and filenames stays small. Keep a copy of it, for example in your cloud storage: it is the only place where the index is stored.Index properties
File > Properties opens the window Index properties with the Title and a Memo of the whole index. The title is shown in the title bar and is the suggested filename when you save. An empty title becomes "Untitled".
3. Discs
Add a disc
Put the CD or DVD in the drive (or connect the USB stick) and choose Disc > Add, Add on the toolbar, or right-click the tree and choose Add disc.... The window Add Disc opens.

- Under Source, choose Folder and type the drive or folder (for example
D:\), choose it from the list with the last five folders, or click ... to browse. - Check Include filenames (larger datafile) if you also want to find files by name. Without it, Discs Index only stores the directories (the number of files is always counted).
- Under Disc, fill in the Title (shown in the tree), and if you like the Creation date, the Vendor, the Media type (choose from CD-ROM to DVD-RW, or type your own) and a Memo. The Read date is today.
- Choose Add.
Discs Index reads the folder with all its subfolders. A small window shows the title of the disc and the folder it is reading; Stop reading stops it (what has been read so far stays in the disc). Afterwards the new disc is selected in the tree, with the number of directories and files it found. Discs Index remembers your choices in this window for the next disc.
A virtual disc
Choose Virtual disc (don't read info) under Source to add a disc with only its information (title, vendor, memo, ...) and without reading any contents. This is useful for a disc that you cannot read at the moment, or for something that is not a disc at all, such as a box of photos or a video tape.
Edit or remove a disc
- Edit: select the disc (or one of its directories) and choose Disc > Edit properties, the toolbar button or Edit properties... in the right-click menu. In the window Disc properties you change the title, creation date, vendor, media type and memo. The read date and the numbers of directories and files stay as they are.
- Remove: select the disc and choose Disc > Remove, the toolbar button or Remove disc. Discs Index asks "Remove '<title>' from Discs Index?" first.
To read a disc again, for example because its contents have changed, remove it and add it again.
Changes are only stored in the .dix file when you save the index.
4. Search
Choose Search on the toolbar, Disc > Search or press Ctrl+F. A search bar appears below the toolbar. Type what you are looking for in Search for: Discs Index searches while you type and selects the first match.

- With the check boxes under Search in you choose where to search: Title, Vendor, Memo (of the discs), Directory name and Filename. All are checked except Filename.
- A match is a disc, a directory or a file. The tree opens at the match and the rest of the tree is collapsed; for a file, its directory is selected and the file is selected in Files.
- Find next (or F3) goes to the next match; after the last one, it starts again at the first. Next to the search field you see for example "2 of 5", or "Not found".
- Upper and lower case do not matter. Only filenames that were included when the disc was added can be found.
Close the search bar with the cross on the right, with Esc, or with Search on the toolbar.
5. Startup parameters
Start Discs Index with the name of an index file to open it directly, for example in a shortcut:
DiscsIndex.exe "D:\Archive\Music.dix"
Use quotes when the path contains spaces. Without a parameter, or when the file does not exist, Discs Index starts with a new, empty index.
Discs Index registers the extension .dix in Windows each time it starts (for your Windows account, without administrator rights). That is why you can double-click a .dix file in Windows Explorer to open it with Discs Index.
Have you moved Discs Index to another folder, start it once from there to update this link.
6. Keyboard shortcuts
| Key | What it does |
|---|---|
| Ctrl+F | Show the search bar and select the search field |
| F3 | Next match |
| Esc (search bar) | Close the search bar |
| Alt+the underlined letter | Open a menu or choose an item, for example Alt+F for the menu File and Alt+D for the menu Disc |
| Enter / Esc (in a window) | Ok or Add / Cancel |
7. If something does not work
"Invalid directory."
The folder or drive in Add Disc does not exist. Check that the disc is in the drive, or choose the folder with ....
"No disc selected."
Select a disc (or one of its directories) in the tree before you choose Remove or Edit properties.
The list Files stays empty
The filenames are only stored when Include filenames (larger datafile) was checked when the disc was added. Remove the disc and add it again with this option checked.
"Error reading Discs Index datafile."
The file is not a Discs Index file or is damaged. The index that was open stays open. Datafiles of older versions of Discs Index can be opened.
Settings
Discs Index remembers the position and size of the window and the choices in Add Disc in %LOCALAPPDATA%\Franck\DiscsIndex\DiscsIndex.json. The discs themselves are only in your .dix files.
A new version
Discs Index checks once a week at startup whether there is a new version. To check yourself, choose Help > Check for updates. You can download the new version from the Discs Index page. Questions or ideas? Please contact me.