 Photo Releaser manual
Photo Releaser gives your photos a name with the date they were taken and a description, for example 2026-10-11 Texel 01.jpg.
It renames the files in their folder, or moves them from your camera to a folder on your hard disk.
You can download Photo Releaser, and read how to install it, on the Photo Releaser page.
1. The main window
Photo Releaser works in two steps: Read reads the files and shows a row per date, where you type a description; Start renames or moves the files.
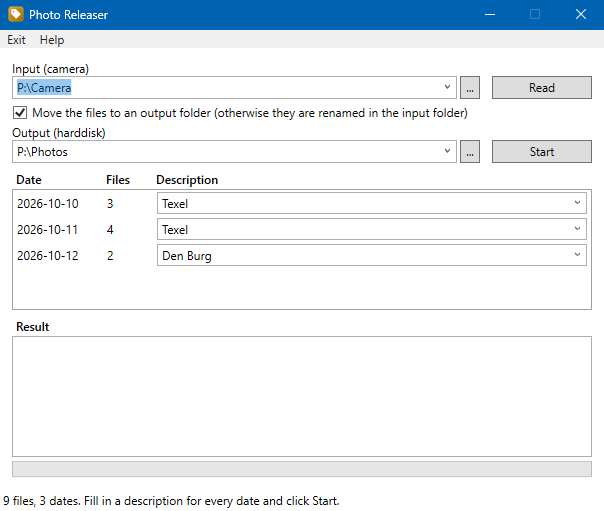
From top to bottom:
- Input (camera): the folder with the photos, with the ... button to choose it, and the Read button.
- Move the files to an output folder: on to move the files, off to rename them in the input folder.
- Output (harddisk): the folder the files are moved to, and the Start button.
- The table with Date, Files (the number of files of that date) and Description.
- Result: the old and the new name of each file.
- The progress bar and the status bar.
You can make the window larger and smaller. Photo Releaser remembers its position and size. You open this manual from Photo Releaser with Help > Manual.
2. Folders
The input folder
Type the folder at Input (camera), choose one from the list, or click ... to browse.
This can be the folder of a camera or phone connected by USB (for example E:\DCIM\100CANON), a memory card, or any folder on your computer.
Only the files in the folder itself are read, not the files in subfolders.
Move or rename
- Move the files to an output folder on (default): the files get their new name in the folder at Output (harddisk). That may also be on another drive.
- Off: the files get their new name in the input folder. The output folder is then disabled.
Photo Releaser remembers this choice.
History
Both folder lists remember the last 10 folders, and the descriptions the last 20. Right-click a list and choose Clear history to empty the list and its text.
3. Step 1: Read
Click Read (Alt+R). Photo Releaser reads all files in the input folder, except hidden and system files (such as desktop.ini and Thumbs.db).
The table then shows a row for every date, and the first description gets the focus.
- The date of a photo is the date it was taken (from the EXIF information that cameras and phones save in JPEG, TIFF and, if Windows can read them, HEIC files). A file without that date, such as a video, gets the date it was last modified.
- Type a description for every date, for example
TexelorBirthday Anna. Spaces are allowed, up to 50 characters. Characters that cannot be in a filename (\ / : * ? " < > |) are ignored while you type. Open the list to choose a description you used before. - Click Read again, for example after taking more photos: descriptions you already typed stay with their date.
- Choose another input folder and the table is emptied; click Read again.
If the folder does not exist, you get the message "Be sure camera is attached and standby in USB mode". An empty folder gives "No files found.".
4. Step 2: Start
Click Start (Alt+S; only after Read). First Photo Releaser checks a few things; if something is wrong, you get a message and nothing is renamed:
- every date has a description, without characters that cannot be in a filename (for example in pasted text);
- the output folder exists;
- if the input and output folder are the same, Photo Releaser asks whether you want to continue.
Then the files are renamed or moved, with the progress in the progress bar. Afterwards the status bar shows how many files were renamed or moved, and how many failed. The table is empty again, ready for the next folder.
5. The new names
A new name is yyyy-mm-dd description number.ext:
- the date the photo was taken;
- the description of that date;
- a number that starts at 1 for every date, in the order the photos were taken (photos taken at the same time in the order of their name);
- the extension in lowercase (
.JPGbecomes.jpg).
The number of digits depends on the number of files that were read: up to 99 files two digits, up to 999 three, and more than that four.
| Old name | Taken | New name |
|---|---|---|
IMG_4711.JPG | 2026-10-11 10:02 | 2026-10-11 Texel 01.jpg |
IMG_4712.JPG | 2026-10-11 14:30 | 2026-10-11 Texel 02.jpg |
MVI_4713.MP4 | 2026-10-12 (modified) | 2026-10-12 Lighthouse 01.mp4 |
- An existing file is never overwritten: that file fails and keeps its old name.
- A file that already has the right name stays as it is.
- Names may be swapped between files that are renamed in the same run (Photo Releaser uses a temporary name in between).
6. The result
The list Result shows each file with its old and new name, sorted by the old name: ✓ means renamed or moved, ✗ means it failed. A file fails when a file with the new name already exists, or when the file is in use.

7. Keyboard shortcuts
| Key | What it does |
|---|---|
| Alt+R | Read |
| Alt+S | Start |
| Alt+M | Move the files to an output folder on / off |
| Alt+H | Help menu |
| Alt+X | Exit |
| Tab | To the next field (after Read: through the descriptions) |
8. If something does not work
The camera is not found
Connect the camera or phone by USB and switch it on (on a phone, allow access to the photos). Check in Windows Explorer which folder the photos are in, and choose that folder with .... You can also put the memory card in a card reader.
A photo gets the wrong date
Photo Releaser uses the date the photo was taken. Check the date and time of the camera. A file without that information (for example a video, or a photo edited by a program that removed the information) gets the date it was last modified.
A file failed (✗)
There already is a file with that name, or the file is in use by another program. Close that program, or remove or rename the existing file, and click Read and Start again.
A new version
Photo Releaser checks once a week at startup whether there is a new version. To check yourself, choose Help > Check for updates; the version is in Help > About. You can download the new version from the Photo Releaser page.
Settings
Photo Releaser saves its settings (the folders, the history and the window position) in %LOCALAPPDATA%\Franck\PhotoReleaser\PhotoReleaser.json.
Delete that file while Photo Releaser is closed to start with the default settings.
Questions or ideas
You are welcome to get in contact.